Introduction
Those who do not learn from history are doomed to repeat it!
This is incredibly apt for the software development world as well. And the act of keeping a tab on a project’s Git history has split the world in half, quite literally.

On one side, there are people who want the history to be a snashot of what exactly happened in a repo, and a non-linear history is not much of a concern to them. The workflow for such a history is quite simple and doesn’t need any more than a working knowledge of git.
On the other side, there are people who prefer to have a clean linear history - free of merge commits, multiple topic commits of feature branches etc. This workflow relies heavily on git rebase, and thus requires a higher level of proficiency than using just the basic git commands.
Irrespective of which camp you fall into, working in a large team, there are high chances the project’s history does not look like you want it to. But, since most of the magic that affects history happens on local, you can still stick to the preferred camp! 😄
Let’s go over the different kinds of git history and required workflows.
Non-linear Git history
Let’s look at what the non-linear history is, and what contibutes to it. If your project history looks anything like the following simplified image you have a non-linear history.

The biggest contibutors to a non-linear history are merge commits. Merge commits are created when git does a 3-way merge between the HEADs of source and target branches. The final outcome is a 3rd commit on the target branch. This can be seen in the figure above when the blue & green (feature) branches merge into black (master).
Merge commits are introduced not just while merging a feature PR into master, but also when you merge master back into a feature. This is often required in active projets where master gets updated frequently.
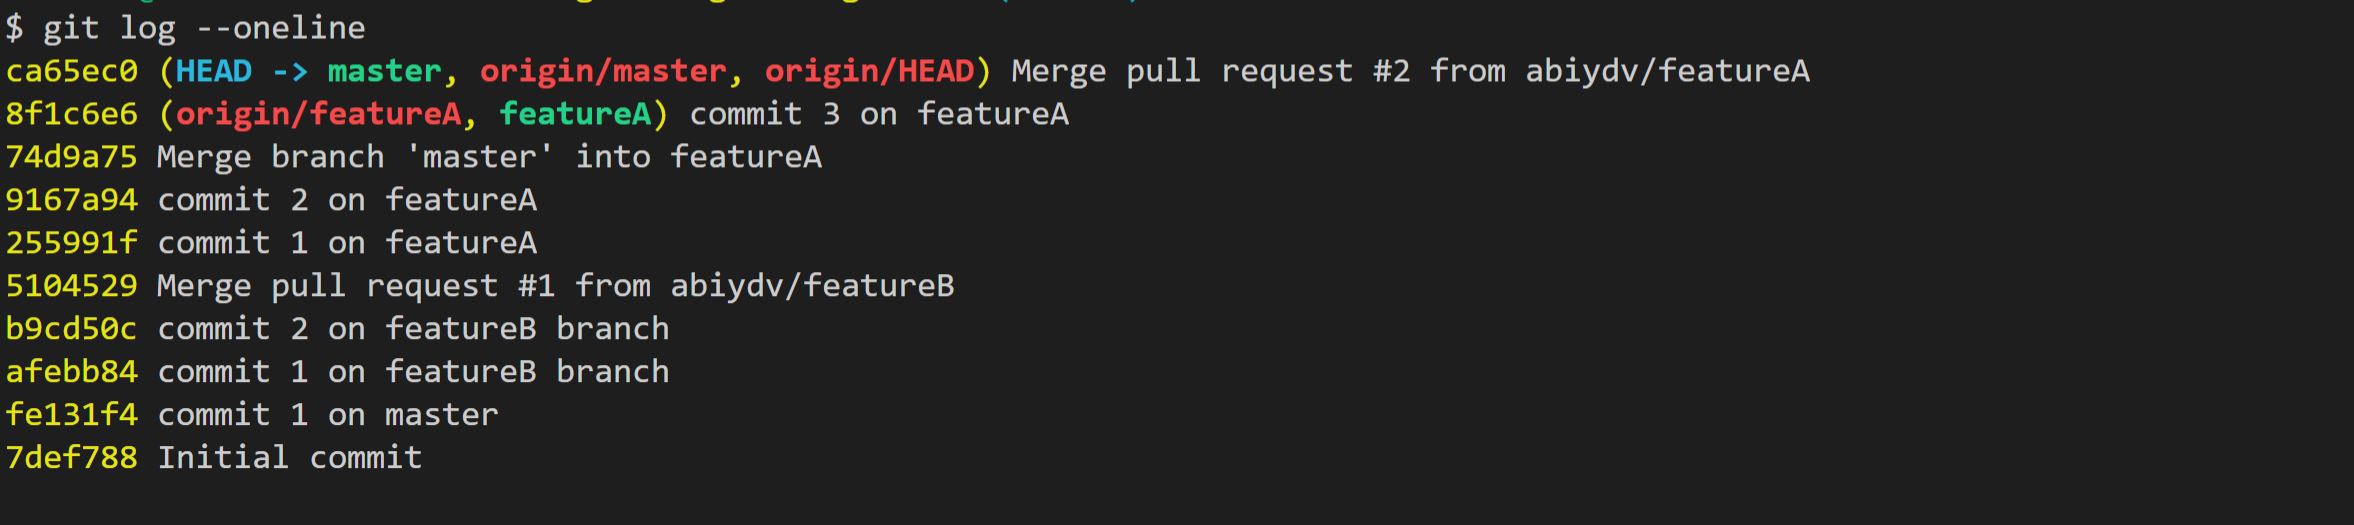 As seen here, the git log will show every commit right down to the ones made on the
 feature branch. It also shows the PR merge events as well as master merge events quite clearly.
What does the workflow look like?
To achieve a non-linear history, there isn’t anything special one needs to do. The below basic high-level steps will eventually result in a non-linear history.
 1# 1. Branch off master
 2$ git checkout -b featureA
 3
 4# 2. Make the changes
 5
 6# 3. Commit the changes
 7$ git add .
 8$ git commit -m "commit 1 on featureA"
 9
10# Repeat 2, 3 while all changes are completed.
11
12# 4. While this change was underway, master was updated.
13#    The latest changes from master need to be merged into the feature branch.
14#    Pull the latest changes from master.
15$ git merge origin/master
16
17# 6. Push to origin and raise PR to master.
18$ git push
19# or
20$ git push --set-upstream origin featureA
21
22# 7. Finally, merge the PR.
As is evident, it is pretty simple and is often the workflow of choice for teams with basic git understanding.
Linear Git history
Now, let’s look at a linear git history and how can it be achieved. If you project’s history looks like the following image, you have a linear history.
 The biggest benefit of a linear history is that it’s easy to follow the project’s progress. This also depends heavily on the teams sticking to a “one feature one commit” philosophy.
What does the workflow look like?
To achieve a linear history, everyone in the team needs to follow the below high-level steps.
 1# 1. Branch off master
 2$ git checkout -b featureC
 3
 4# 2. Make the changes
 5
 6# 3. Commit the changes
 7$ git add .
 8$ git commit -m "commit 1 on featureC"
 9
10# Repeat 2, 3 while all changes are completed.
11
12# 4. Rebase all commits on local branch (Ref 1 below)
13$ git rebase -i HEAD~3
14
15# 5. While this change was underway, master was updated.
16#    The latest changes from master need to be merged into the feature branch.
17#    Pull the latest changes from master (Ref 2 below)
18$ git rebase -i origin/master
19
20# 6. Push to origin and raise PR to master.
21#    If the local branch has already been pushed to remote,
22#    use the '--force-with-lease' flag.
23$ git push
24# or
25$ git push --force-with-lease
26
27# 7. Finally, merge the PR.
Ref 1: Above git rebase -i command launches an interactive UI to select and choose the commits to work with -

There are several options to complete the rebase, most common ones being squash (commit messages from individual commits are added to the final commit message) and fixup (commit messages are discarded)

Ref 2: After this completes successfully, the history will start to look like this -

👉 Note: rebase is a poweful command, keep these things in mind to avoid unforseen issues -
- Don’t
rebasecommits already pushed tomaster. Try to run it on local commits as much as possible. - Don’t
rebasecommits which are part of a PR as it will mean rework for reviewers. - Use
--force-with-leaseinstead of-fto avoid wiping out other’s changes already pushed toremote.
Conclusion
There is no one size fits all in this case of Git history. There are pros & cons of each approach. While I personally strive to keep the history clean by following the second workflow, I have no issues in working with teams which feel comfortable with the first workflow. I still manage to keep my end of the project clean in such a case.
Hope this post proves useful. 👍
Note: Code mentioned above is here